Want to try Saxo's Excel add-in live? Let's get started in less than 5 minutes! Follow the below steps and get your first formula up and running in Excel. If you already have a simulation account with Saxo Bank, you can skip straight to step 2.
Step 1: Request a Saxo Bank simulation account on this page
OpenAPI for Excel is directly enabled for new simulation accounts (also known as demo accounts). Create an account via the above link, after which a confirmation appears. Next:
- Check your email for your username & password. Keep in mind the email could be labelled as spam.
- Log in to SaxoTraderGO with these credentials.
- Complete the 2-step Platform Setup and make sure to enable Forex on the final screen.
- Click Enter to start trading.
- Trade some FX! (This is not strictly necessary, although the sample formula showcased in step 5 will be blank without open positions)
Step 2: Download the latest Excel add-in from the Downloads section
Make sure to check for 32/64-bit compatibility beforehand (as described on the linked page).
Step 3: Open the .xll-file to launch the OpenAPI for Excel add-in
No installation is required for one-time use. For more information regarding installation of the add-in, see the Downloads section.
Excel will show a warning prompt to add Saxo Bank as trusted publisher if this is the first time the add-in is loaded. Click Enable all code published by this publisher to continue. For more information on Excel warning prompts, see Support.
Step 4: Log in to OpenAPI for Excel
- Navigate to OpenAPI in the Excel ribbon and click the Log in button.
- Log in using the account created before through the browser window that appears on the left.
- Accept the disclaimer prompts.
- You are now ready to start using the add-in.
Step 5: Load live net positions with the Formula Builder
Now that everything is set up, let's pull out the net positions on the account we created in step 1 using the following steps:
- Click the Formula Builder button in the OpenAPI tab.
- In the screen that appears, select the NetPositions under Service at the top.
- Next, pick "Subscription: /openapi/port/v1/netpostitions/subscriptions" under Endpoint. The ClientKey is populated automatically. Leave the other fields unchanged.
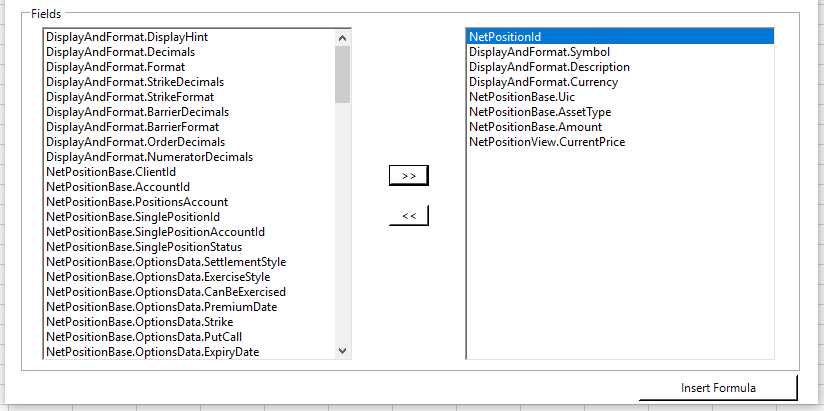
- Add the following 8 fields under the section Fields:
- Click Insert Formula, after which net positions and live updating prices are loaded into the spreadsheet:
(Optional) Step 6: Add new positions through SaxoTraderGO and track changes in Excel
For bonus points, add/close FX positions in GO and keep an eye on Excel to watch the updates filter through. To explore more functionality offered by OpenAPI for Excel, see the Tutorial Series.


